
Gravwell Single Sign-On#
Gravwell’s GUI supports single sign-on using SAML. In theory, any SAML-compliant Identity Provider can be used to log in. This page describes Gravwell’s SSO configuration options, then show an example of how Gravwell can be configured to authenticate with a Windows AD FS server and other SSO providers.
Note
Although regular users log in via SSO, the default ‘admin’ user does not. Be sure you change the admin user’s password when you set up a new system, even if you configure SSO immediately. Be aware also that the Gravwell admin user can still create new non-SSO user accounts from within the GUI if needed.
Gravwell SSO Configuration Parameters#
To enable SSO on a Gravwell instance, we must insert an SSO section into the webserver’s gravwell.conf file. Here is a minimal configuration which will work with a Windows AD FS server:
[SSO]
	Gravwell-Server-URL=https://gravwell.example.org
	Provider-Metadata-URL=https://sso.example.org/FederationMetadata/2007-06/FederationMetadata.xml
These are the basic SSO configuration parameters:
Gravwell-Server-URL(required): specifies the URL to which users will be redirected once the SSO server has authenticated them. This should be the user-facing hostname or IP address of your Gravwell server.Provider-Metadata-URL(required): specifies the URL of the SSO server’s XML metadata. The path shown above (/FederationMetadata/2007-06/FederationMetadata.xml) should work for AD FS servers, but may need to be adjusted for other SSO providers.Insecure-Skip-TLS-Verify[default: false]: if set to true, this parameter instructs Gravwell to ignore invalid TLS certificates when communicating with the SSO server. Set this option with care!Enable-Verbose-Logging[default: false]: if set to true, Gravwell will emit additional information about SSO authentication every time a user logs in. This may be helpful if you are having trouble with your SSO configuration; see the section on querying SSO logs for more tips.Enable-Very-Large-Sessions[default: false]: if set to true, Gravwell will enable an alternative method of storing & distributing SAML session objects. This can be useful if your IdP is sending extremely large sessions, for example if a user is a member of dozens of groups; the usual symptom of this problem is that logins enter a redirect loop before finally giving up. This is disabled by default because it is slightly more network- and memory-intensive to use this option when also using a datastore, and because most deployments do not need it.
The following are more advanced parameters which may need to be adjusted based on your SSO provider. The defaults are suitable for Microsoft AD FS servers.
Username-Attribute[default: “http://schemas.xmlsoap.org/ws/2005/05/identity/claims/upn”]: defines the SAML attribute which will contain the username. On a Shibboleth server this should be set to “uid” instead.Common-Name-Attribute[default: “http://schemas.xmlsoap.org/claims/CommonName”]: defines the SAML attribute which will contain the user’s “common name”. On a Shibboleth server this should be set to “cn” instead.Given-Name-Attribute[default: “http://schemas.xmlsoap.org/ws/2005/05/identity/claims/givenname”]: defines the SAML attribute which will contain the user’s given name. On a Shibboleth server this should be set to “givenName” instead.Surname-Attribute[default: “http://schemas.xmlsoap.org/ws/2005/05/identity/claims/surname”]: defines the SAML attribute which will contain the user’s surname.Email-Attribute[default: “http://schemas.xmlsoap.org/ws/2005/05/identity/claims/emailaddress”]: defines the SAML attribute which will contain the user’s email address. On a Shibboleth server this should be set to “mail” instead.
Gravwell can be configured to receive a list of group memberships with the user’s login response, auto-generate any required groups, and add the user to those groups. To enable this, you must set Groups-Attribute and define at least one Group-Mapping:
Groups-Attribute[default: “http://schemas.microsoft.com/ws/2008/06/identity/claims/groups”]: defines the SAML attribute which contains the list of groups to which the user belongs. You will typically have to explicitly configure the SSO provider to send the group list.Group-Mapping: Defines one of the groups which may be automatically created if listed in the user’s group memberships. This may be specified multiple times to allow multiple groups. The argument should consist of two names separated by a colon; the first is the SSO server-side name for the group (typically a name for AD FS, a UUID for Azure, etc.) and the second is the name Gravwell should use. Thus, if we defineGroup-Mapping=Gravwell Users:gravwell-users, if we receive a login token for a user who is a member of the group “Gravwell Users”, we will create a local group named “gravwell-users” and add the user to it.
Gravwell can also enable/disable the administrator flag on user accounts based on additional attributes in the SAML message:
Admin-Attribute: Defines a SAML attribute that contains a true/false value to determine if a user should be an administrator or not. If this attribute exists on the SAML assertion, the user’s admin flag will be set correspondingly. Thus, if we specifyAdmin-Attribute=isAdminand receive a SAML message with an “isAdmin” attribute containing the string “true”, the user will be made an admin. The following values are considered “true” for the purposes of this attribute: “true”, “TRUE”, “t”, “T”, “1”. Anything else is false.
Note
If Admin-Attribute is not configured, Gravwell will not modify the user’s admin flag during SSO login, meaning accounts may be manually set as admins. If Admin-Attribute is configured but the SSO IdP does not send the desired attribute, Gravwell will not modify the user’s admin flag.
Note
SSO requires TLS certificates to be installed on webservers so that SAML requests can be signed and validated. In HA webserver configurations it is important that the same certificates are installed on all webservers in case SAML identity provider responses are sent to a webserver that did not originate the request. Certificates used for SSO may be self-signed. See Configuring TLS Certificates for more information.
Setting up Keycloak#
Documentation on setting up SSO with Keycloak is separated into its own page. Click here to read it.
Setting up Okta#
Documentation on setting up SSO with Okta is separated into its own page. Click here to read it.
Setting up Azure Active Directory#
Documentation on setting up SSO with Azure Active Directory is separated into its own page. Click here to read it.
Setting up Windows Server 2016#
Gravwell SSO works well with Microsoft’s AD FS (Active Directory Federation Services) as provided with Windows Server. We’ll describe how to configure AD FS and Gravwell for SSO authentication.
You must have Active Directory and AD FS installed on your server before you begin. Basic installation and setup of these services is outside the scope of this document–we assume that if you’re setting up SSO, you probably already have Active Directory configured!
Attention
It is essential that any user accounts you intend to use with Gravwell must have an email address set in Active Directory! This is used as the username internally to Gravwell. If you get errors in the event log with EventID 364, this is why!
Set up Gravwell#
In order to configure AD FS, you’ll need an SSO metadata file from your Gravwell instance. We’ll therefore set up Gravwell first; you’ll see an SSO button on the Gravwell GUI, but it will be disabled until we configure AD FS. To enable SSO, you must have TLS certificates (self-signed or otherwise) configured on the Gravwell webserver; see this documentation section for instructions on setting up TLS.
Open your gravwell.conf and add an [SSO] section below the [Global] section. If your AD FS server is at “sso.example.org” and your Gravwell webserver is at “gravwell.example.org”, your config might look like this:
[SSO]
	Gravwell-Server-URL=https://gravwell.example.org
	Provider-Metadata-URL=https://sso.example.org/FederationMetadata/2007-06/FederationMetadata.xml
If for some reason you are using self-signed certificates on your AD FS server, you will need to add Insecure-Skip-TLS-Verify=true to the section.
Now restart the Gravwell webserver (systemctl restart gravwell_webserver.service). It should come back up; if not, check for typos in your configuration and look in /dev/shm/gravwell_webserver.service and /opt/gravwell/log/web/ for errors.
Add Relying Party#
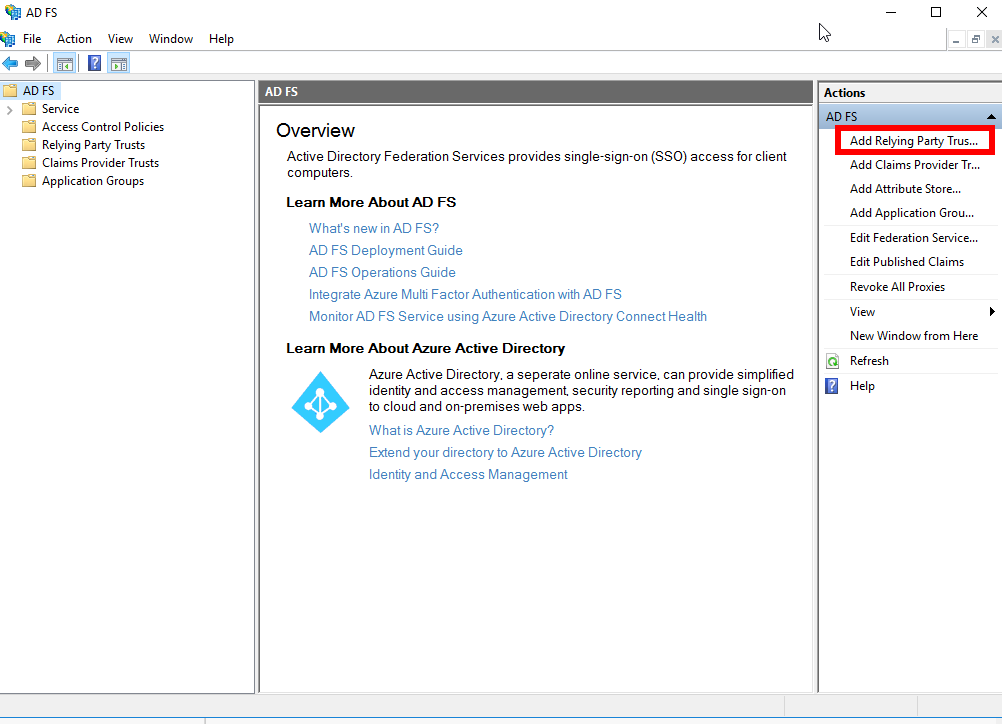
We must now configure the AD FS server to accept authentication requests from Gravwell. Open the AD FS management tool and select “Add Relying Party Trust”:
This will open the Add Relying Party Trust wizard. It will first ask if you want a Claims-Aware or Non-Claims-Aware application; select Claims-Aware and click Start.
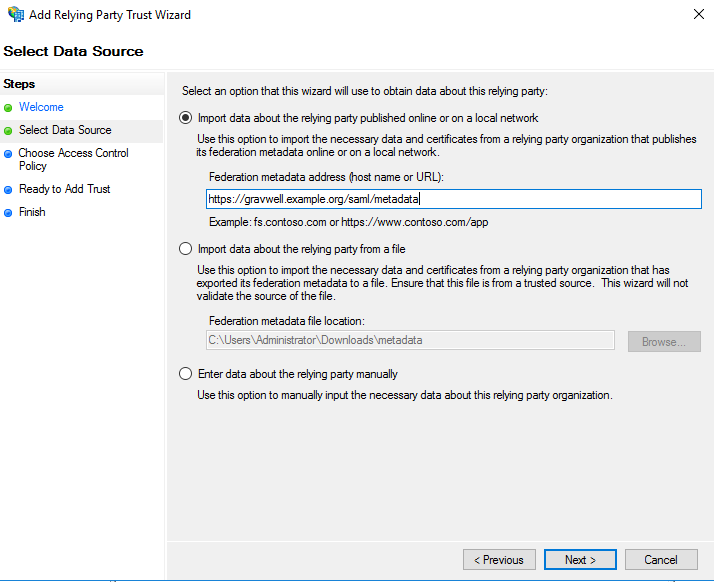
You must now select one of two ways to get metadata information about your Gravwell server into AD FS. If your Gravwell server uses properly-signed TLS certificates, you can simply enter a URL in the “Federation metadata address” field of the first option and click next:
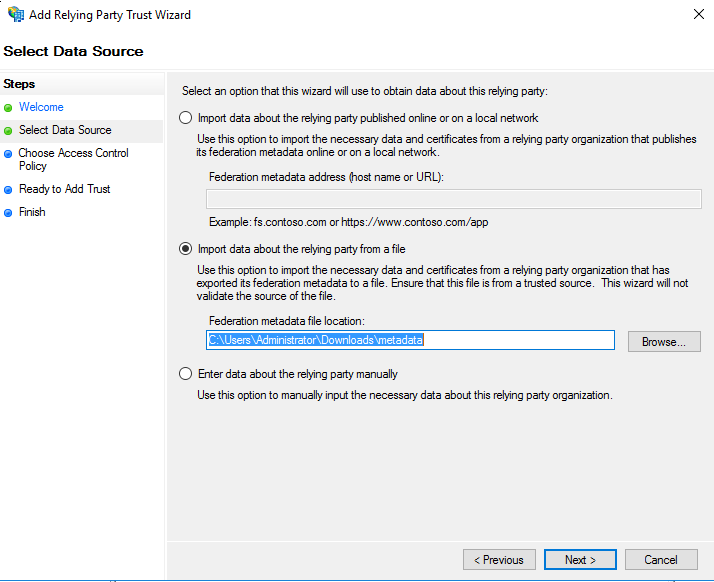
If, however, Gravwell is using self-signed certificates, you must manually download the metadata first. Open the web browser and go to https://gravwell.example.org/saml/metadata. Save the file when prompted, then go back to the wizard and set the appropriate path in the second option:
On the next page of the wizard, you will be prompted to set a display name. “Gravwell” or something similar would be fine. In the further pages of the wizard, you should be able to leave the defaults.
Change Hash Algorithm#
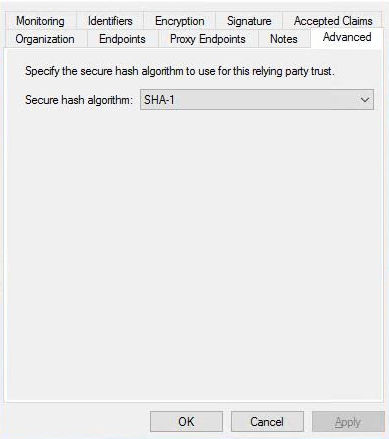
At this time, Gravwell’s SAML implementation requires SHA-1 signatures, but Windows AD FS defaults to SHA-256. Open the properties dialog for the newly-created relying party, select the Advanced tab, and change the hash algorithm to SHA-1:
If you forget to make this change, upon attempting to log in you will see a “Forbidden” page. The Gravwell webserver stderr file at /dev/shm/gravwell_webserver.service will contain an error message from the SAML library with the status urn:oasis:names:tc:SAML:2.0:status:Responder indicating that the responder (AD FS) experienced a problem. If you see these symptoms, double-check the hash algorithm in AD FS.
Edit Claims Issuance Policy for Relying Party#
You must now add a few claims issuance transform rules to the relying policy. Select “Edit Claim Issuance Policy” for the newly-created relying party:

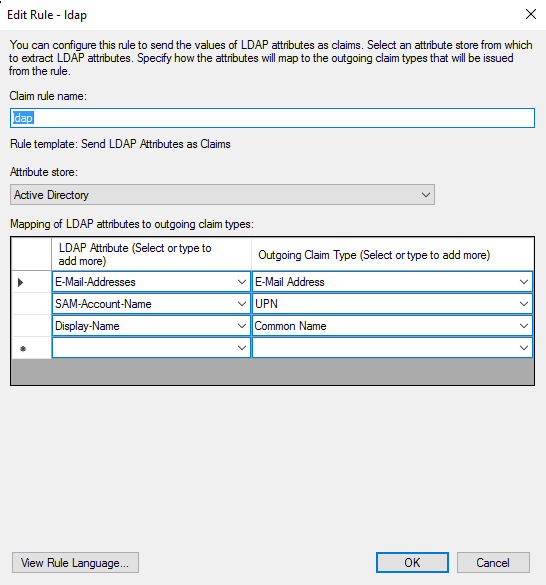
You must create three rules. First, click Add Rule to open the wizard; select “Send LDAP Attributes as Claims”, click Next, and populate it as shown below:
Next, create another rule, this time selecting “Transform an Incoming Claim” and populating it as shown below:
![]()
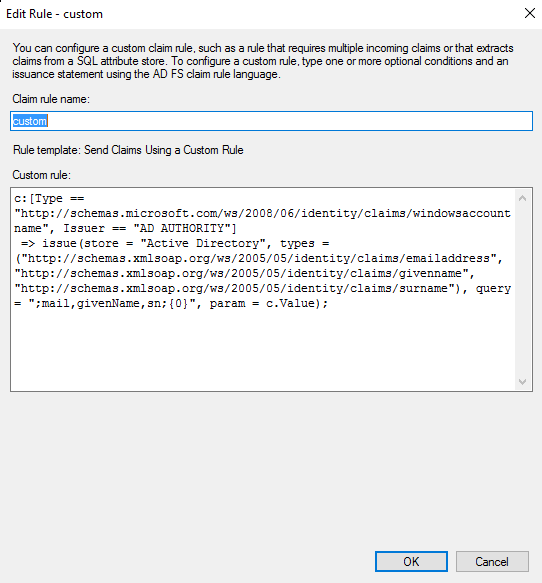
Finally, create another rule, selecting “Send Claims Using a Custom Rule” and pasting in the following text into the field:
c:[Type == "http://schemas.microsoft.com/ws/2008/06/identity/claims/windowsaccountname", Issuer == "AD AUTHORITY"]
=> issue(store = "Active Directory",
types = ("http://schemas.xmlsoap.org/ws/2005/05/identity/claims/emailaddress",
"http://schemas.xmlsoap.org/ws/2005/05/identity/claims/givenname",
"http://schemas.xmlsoap.org/ws/2005/05/identity/claims/surname"),
query = ";mail,givenName,sn;{0}", param = c.Value);
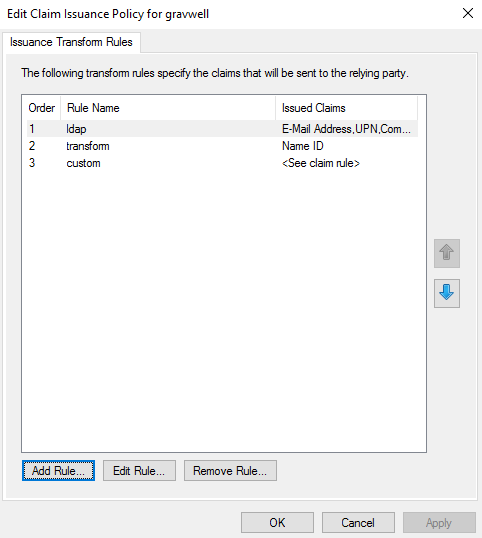
When finished, you should have three rules:
(Optional) Send Group Info#
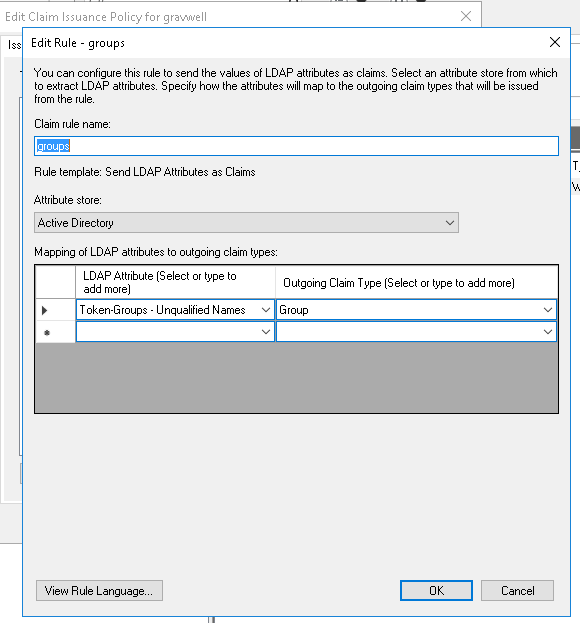
Gravwell can automatically create groups and add SSO users to these groups as mentioned earlier in this document. You can configure Active Directory to send a claim containing a list of group names by creating an LDAP claim rule that maps “Token-Groups - Unqualified Names” to “Group” as shown in the screenshot below:
In gravwell.conf, you’ll need to add a Groups-Attribute field (http://schemas.xmlsoap.org/claims/Group if you set the outgoing claim type to “Group” as shown above) to indicate which attribute contains the list of groups. You’ll also need at least one Group-Mapping field to map Active Directory group names to desired group names within Gravwell. The example below maps an AD group named “Gravwell Users” to a Gravwell group named “gravwell-users”:
	Groups-Attribute=http://schemas.xmlsoap.org/claims/Group
	Group-Mapping=Gravwell Users:gravwell-users
Note
According to the Microsoft spec, the maximum number of groups allowed in a SAML token is 150.
Test Configuration#
With AD FS and Gravwell both configured, you should now see the SSO login button enabled on the Gravwell login page:
Clicking it will take you to the Windows server’s AD FS authentication page. Authenticate as one of your Active Directory users, including the domain in the username (so type “jfloren@gravwell.io” rather than just “jfloren”).
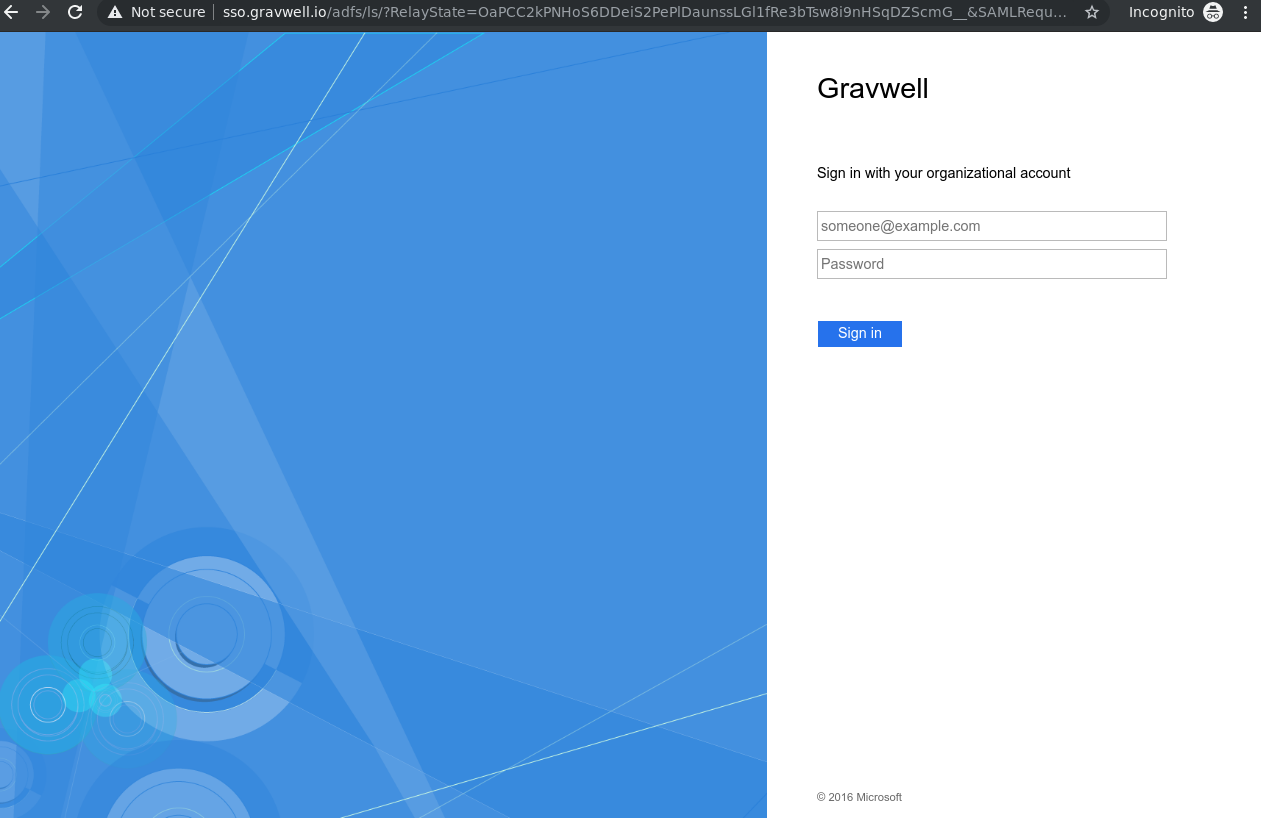
Once you click Sign In, you should be taken back to the Gravwell UI, this time logged in as the appropriate user.
SSO Logs#
Information about SSO logins is logged to the gravwell tag, with a MsgID field containing “sso.go”:
tag=gravwell syslog MsgID~sso.go
Each incoming SAML request is assigned a random transaction ID, which can be useful if you want to filter down to just the logs relating to a specific login attempt:
tag=gravwell syslog MsgID~sso.go transaction==1234567
The quickest way to identify potential problems is often by looking for the presence of the error field:
tag=gravwell syslog -s MsgID~sso.go error
If you are having trouble with group mappings, look for the following strings in the Message field of your logs:
"Couldn't initialize SSO group"
"Couldn't add user to SSO group"
"Created group via SAML"
"added user to SSO group"
"Removing user from group due to SSO auth"
"found group mapping for SAML-provided group ID"
"no group mapping for SAML-provided group ID"
Note
Some logs are commonplace and are suppressed unless the Enable-Verbose-Logging configuration parameter is set; it’s very helpful to turn on that parameter if you are debugging SSO problems.