
Configuring TLS Certificates#
Gravwell ships without TLS certificates by default, meaning all communications will be unencrypted until you set up certificates. We did this because using auto-generated self-signed certificates tends to both frighten users with the browser’s warnings and provide a false sense of security. It is difficult to properly validate a self-signed certificate and there is a real risk of training users to simply accept potentially impersonated certificates. This is compounded by the extremely fickle behavior of Chromium-based browsers, which timeout certificate exceptions in unpredictable ways (you are often forced to close EVERY Chromium/Chrome zygote process in order to re-accept the certificate).
We strongly recommend that you acquire fully validated certificates from a trusted provider if you plan to expose the Gravwell system to the Internet. The folks at LetsEncrypt are a great resource for learning about proper certificate validation, and they provide free certificates that are trusted by every major browser.
The Gravwell administrator has three options for certificates:
Continue to use unencrypted HTTP only. This is suitable for installations that will only be accessed on a trusted private network, or where Gravwell will be fronted by an HTTP proxy such as nginx.
Install a properly-signed TLS certificate. This is the ideal configuration, but typically requires the Gravwell instance to have a publicly-accessible hostname.
Install a self-signed certificate. This makes sense when you want to encrypt traffic to Gravwell but for one reason or another cannot get a properly signed certificate.
Warning
Switching your cluster from plaintext to TLS will break things if you do not update every component which was using the plaintext methods. This is especially common when converting a webserver to HTTPS: the search agent must be reconfigured to use HTTPS or automations will no longer run!
Hostnames in TLS Certificates#
When connecting to a TLS-secured service, the client will check that the server’s certificate is valid for the hostname the client is trying to access. If you have a valid certificate for gravwell.example.org, but you decide to access your Gravwell server directly by IP, e.g. https://10.0.0.2/, your web browser will most likely warn you that the certificate presented is invalid. Components of a Gravwell cluster may also communicate with each other over TLS-secured connections, and unless they are specifically configured to skip certificate validation these services will fail if the hostname they are given doesn’t match the names on the certificate.
When provisioning your TLS certificates, make sure the Common Name (CN) and Subject Alternative Names (SANs) cover all hostnames or IP addresses you will ever use to connect to the system. If you have multiple DNS entries for the same system – for example, if your webserver is accessible from both the Internet (gravwell.example.org) and within your own LAN namespace (gravwell.internal.lan) – be sure all those names are in the certificate!
Here’s a brief list of some of the ways Gravwell components communicate via TLS connections; make sure your certificates are appropriate for any of these situations you intend to deploy:
Ingesters talk to indexers (
Encrypted-Backend-Targetin the ingester config file)Indexers talk to other indexers via replication
Indexers talk to the cloud archive service
Webservers in a cluster talk to the datastore
Webservers in a cluster talk to other webservers (
External-Addr, see docs)Search Agents talk to the webservers.
Generally, you will see entries in the relevant component’s log files if there is a TLS problem; if you see logs about invalid certificates, but you believe that your certificate should be correct, double-check the hostnames you’ve set in the config files against the hostnames present in the certificate’s CN and SAN fields.
Allowed TLS Ciphers#
A number of TLS ciphers are considered cryptographically insecure, so Gravwell only supports the following TLS ciphers:
RSA-WITH-AES-256-CBC-SHA
ECDHE-ECDSA-WITH-AES-256-CBC-SHA
ECDHE-RSA-WITH-AES-256-CBC-SHA
ECDHE-ECDSA-WITH-AES-256-GCM-SHA384
AES-128-GCM-SHA256
AES-256-GCM-SHA384
CHACHA20-POLY1305-SHA256
Using HTTP only#
This is the default configuration for Gravwell, and no changes are needed to use it. It is suitable for someone experimenting with Gravwell on a home network, or evaluating it on an experimental network for work. It is also an acceptable configuration when the Gravwell webserver will be accessed through a load balancer/reverse proxy such as nginx; this allows the proxy to perform HTTPS encryption/decryption, taking load off the Gravwell system.
Please note that without a certificate, ingesters will be unable to encrypt their traffic to the indexer. If you wish to encrypt ingester traffic but leave the webserver in HTTP-only mode, you may install a certificate as described in either of the other sections, but only uncomment the Certificate-File, Key-File, and TLS-Ingest-Port options in gravwell.conf. This will enable TLS for the indexer but not the webserver.
Note
If you configure distributed webservers and a datastore with HTTPS disabled, you must set the Datastore-Insecure-Disable-TLS flag in gravwell.conf for both the datastore and the webservers.
Install a properly-signed TLS certificate#
A properly-signed TLS certificate is the most secure way to access Gravwell. Browsers will automatically accept the certificate without complaint.
Obtaining a certificate is outside the scope of this documentation; consider either purchasing a certificate through one of the traditional providers or using LetsEncrypt to obtain a free one.
To use the certificate, Gravwell must be told where the certificate and key files are. Assuming the files are at /etc/certs/cert.pem and /etc/certs/key.pem, edit gravwell.conf to uncomment and populate the Certificate-File and Key-File options:
Certificate-File=/etc/certs/cert.pem
Key-File=/etc/certs/key.pem
Note
These files must be readable by the “gravwell” user. However, take care to protect the key file from other users; if it is made world-readable, any user on the system can access the secret key.
To enable HTTPS on the webserver, change the Web-Port directive from 80 to 443, then comment out the Insecure-Disable-HTTPS directive.
To enable TLS-encrypted ingester connections, find and uncomment the line TLS-Ingest-Port=4024.
To enable HTTPS for the search agent, open /opt/gravwell/etc/searchagent.conf and comment out the Insecure-Use-HTTP=true line and change the port in the Webserver-Address line from 80 to 443.
Finally, restart the webserver, indexer, and search agent:
systemctl restart gravwell_webserver.service
systemctl restart gravwell_indexer.service
systemctl restart gravwell_searchagent.service
Note
If using the datastore and multiple webservers, you must set the Search-Forwarding-Insecure-Skip-TLS-Verify parameter to true to enable webservers to communicate with each other using self-signed certs. If the datastore also uses self-signed certificates, set Datastore-Insecure-Skip-TLS-Verify on the webservers to enable them to communicate with the datastore.
Install a self-signed certificate#
Although it is not as secure as a proper TLS certificate, a self-signed certificate will ensure encrypted communication between users and Gravwell. By instructing browsers to trust the self-signed cert, it is also possible to avoid recurring warning screens.
First, we will generate a 1-year certificate in /opt/gravwell/etc using gencert, a program we ship with the Gravwell install:
cd /opt/gravwell/etc
sudo -u gravwell ../bin/gencert -host HOSTNAME
Make sure to replace HOSTNAME with either the hostname or the IP address of your Gravwell system. You can specify multiple hostnames or IPs by separating them with commas, e.g. gencert -h gravwell.floren.lan,10.0.0.1,192.168.0.3
Now, open gravwell.conf and uncomment the Certificate-File and Key-File directives. The defaults should point correctly to the two files we just created.
To enable HTTPS on the webserver, change the Web-Port directive from 80 to 443, then comment out the Insecure-Disable-HTTPS directive.
To enable TLS-encrypted ingester connections, find and uncomment the line TLS-Ingest-Port=4024.
To enable HTTPS for the search agent, open /opt/gravwell/etc/searchagent.conf and comment out the Insecure-Use-HTTP=true line and change the port in the Webserver-Address line from 80 to 443.
Finally, restart the webserver, indexer, and search agent:
systemctl restart gravwell_webserver.service
systemctl restart gravwell_indexer.service
systemctl restart gravwell_searchagent.service
Making browsers trust the self-signed certificate#
Browsers will issue a warning if a certificate is not signed by a recognized root CA. However, we can make the browser trust our certificate by installing it manually.
Firefox#
Installing the certificate in Firefox is simple. First, navigate to your Gravwell instance via HTTPS. Firefox should display a screen similar to this:
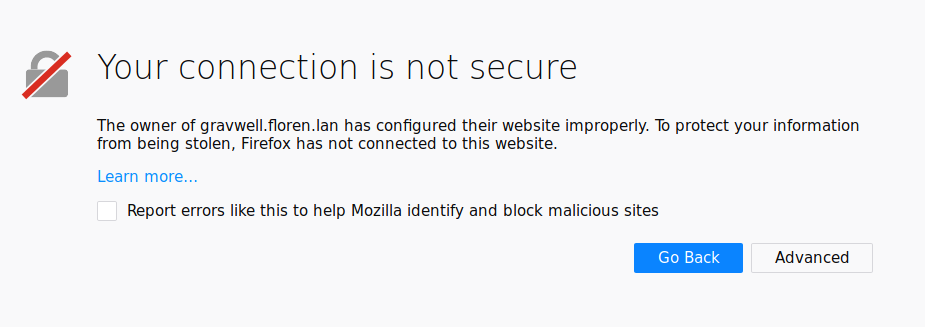
Click the ‘Advanced’ button:
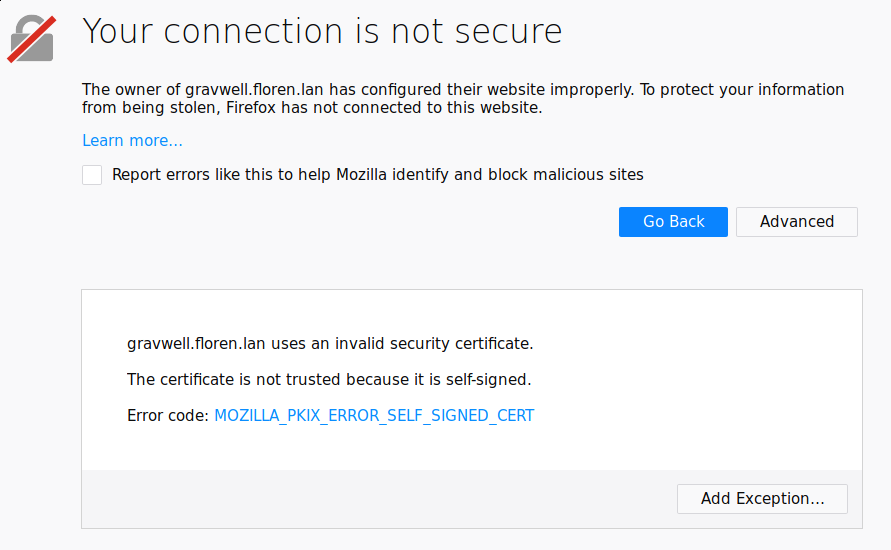
Then click ‘Add Exception…’:
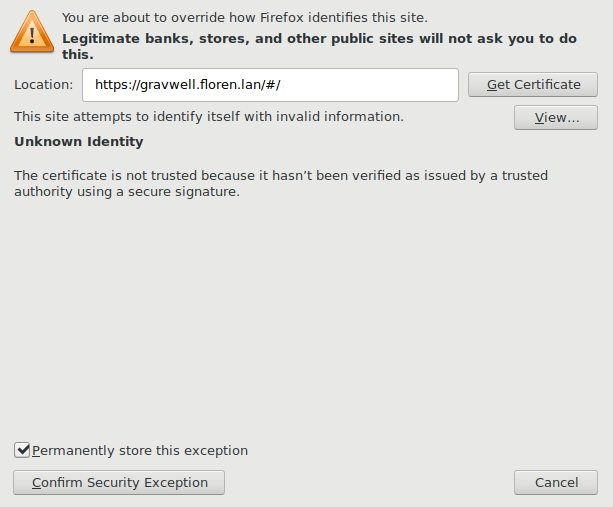
The defaults should be appropriate, but make sure ‘Permanently store this exception’ is checked. Click ‘Confirm Security Exception’.
Firefox should now accept your self-signed certificate until the certificate expires.
Chrome#
Installing a certificate in a Chrome browser is slightly more complicated. First, navigate to your Gravwell instance via HTTPS. Chrome will display a warning screen:
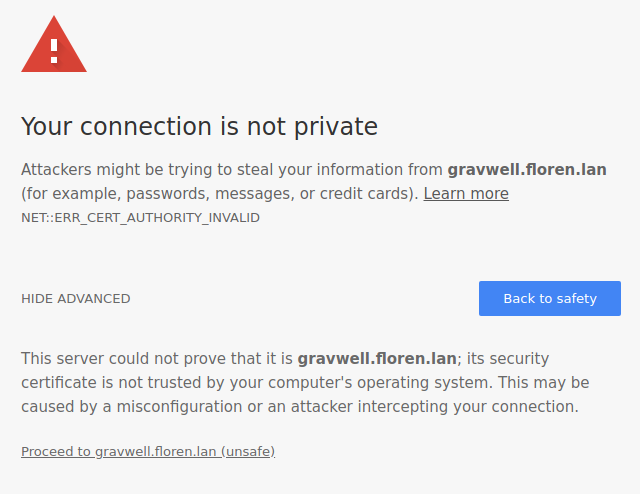
Click the ‘Not Secure’ label in the address bar:
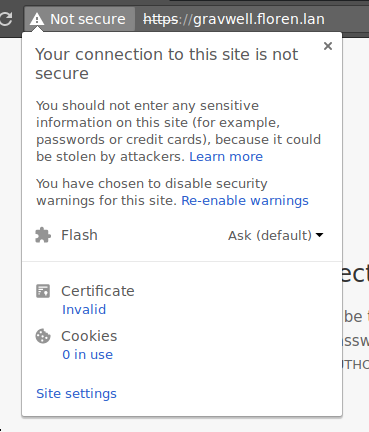
Then click the ‘Invalid’ link under ‘Certificate’. A Certificate Viewer window should open; click the ‘Details’ tab:
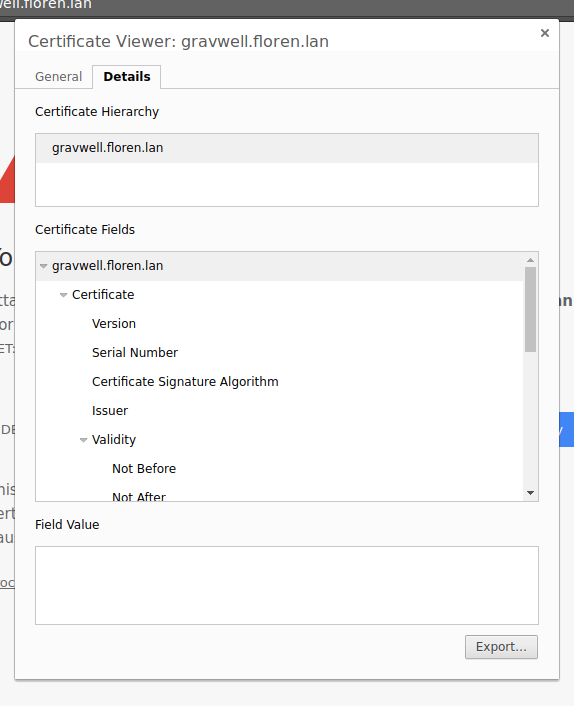
Select the ‘Export’ button. Chrome will display a file dialog to save the certificate; save it somewhere and remember the location.
Now, enter chrome://settings in your address bar or open Settings from the Chrome browser menu. Scroll to the bottom and click the Advanced button:
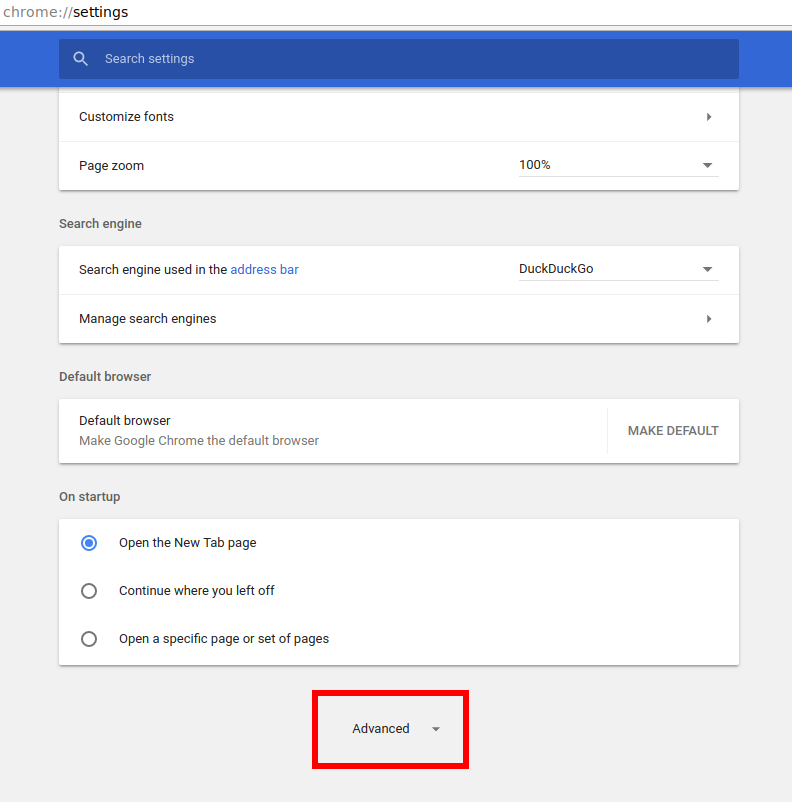
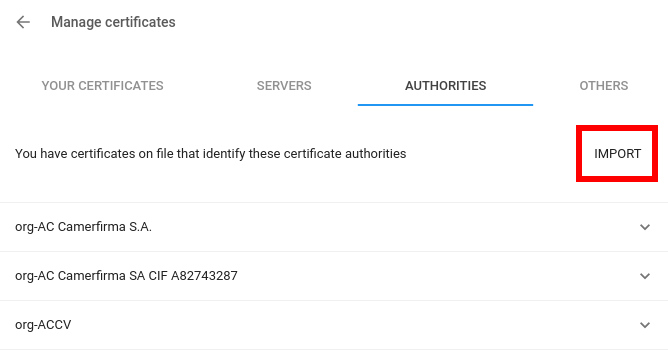
Within the ‘Privacy and Security’ section, find and click ‘Manage certificates’:
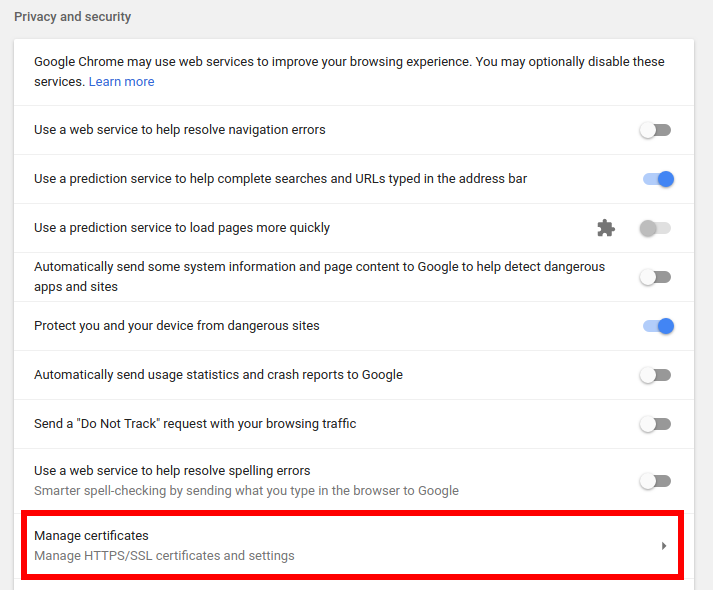
Now select the ‘Authorities’ tab and click ‘IMPORT’:
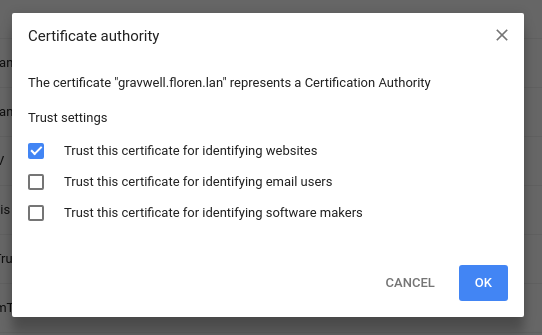
A file dialog will open; select the certificate file you saved earlier. Then, in the next dialog, check ‘Trust this certificate for identifying websites’ and click Ok:
Now you should be able to refresh the Gravwell tab without further SSL warnings.